More instructions on a 9 patch block

So back in November 2009, I started a tutorial for making a 9 patch block but I didn’t finish it.  Just like the quilt that I started for the tutorial is still sitting in the block box and not finished.  However, there are some pictures from the first round that didn’t get posted so her is part 2 in How to Make a 9 Patch block quilt –

When we left off 3 years ago, I had suggested marking the 1/4″ seam allowance on the sewing machine like this.

Marking a quarter inch seam allowance on your machine

Marking a quarter inch seam allowance on your machine

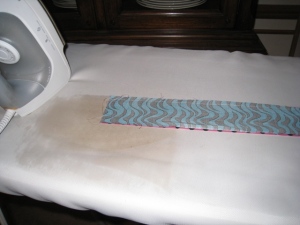
The next step is to play with the iron. I like having a good heavy iron for quilting because it’s important to press with the iron, not “iron”.  Rubbing the iron back and forth can stretch the fabric, especially when working on the bias in triangles.

Lay the strip with the darker fabric on top

Lay the strip with the darker fabric on top

The reason for putting the darker fabric on top is when you open the seam, it will then lay toward the darker fabric.

Press the seam to set it.

Press the seam to set it.

It’s really tempting to just slide the iron down the seam but it’s important to pick up the iron, set it down and press, pick up the iron, repeat.  The times I slide the iron, I end up with curved seams. Press the entire length of the strip.

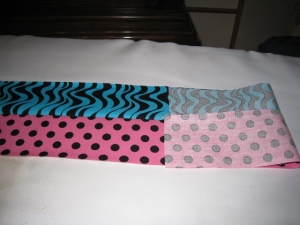
open the strip and press the seam open

open the strip and press the seam open

I was taught that whatever direction you open, is how the seam will lay.

What it looks like pressed open

What it looks like pressed open

The two really good suggestions I was given were 1. Go in the direction of the fewest seams and 2. Lay the seam to the darker color so it doesn’t show through.

view of the seam laying on the dark side

view of the seam laying on the dark side

Now add the third strip to this set.

Again, darkest fabric in the seam on top.

Again, darkest fabric in the seam on top.

So on your strip where the light fabric is on the inside the pressed seams lay toward the outside dark strips and where the light fabric is on the outside, the seams will lay toward the inside.

Now there are 2 set of three strips

Now there are 2 set of three strips

Now that we have the 2 sets of 3 strips, it’s time to cut them to make blocks.

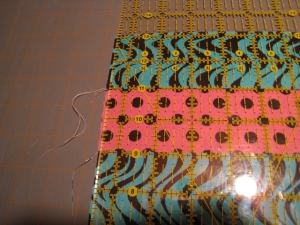
Create a straight edge

Create a straight edge

Line one of the lines of the ruler with the line of the seam in order to get a perpendicular line, now you can use the rotary cutter to create a straight edge to your strips.

Cut blocks the same size as original strips.

Cut blocks the same size as original strips.

Cut new strips the same size as the original strips, in this case, I was using 2.5 inch strips so I’m going to cut this portion the same size as my original strips.

Lay out the new strips to form blocks.

Lay out the new strips to form blocks.

Lay out the strips to form the 9 patch blocks.  I had enough to make 5 blocks 2 with the light fabric in the corners and 3 with the dark fabric in the corners.

abut the seams

abut the seams

So this is where my obsession with pressing the seams the correct direction come into play.  Since we pressed all the seams to the dark side, we now have a way to make our corners perfect, abut the seams so they line up perfectly.

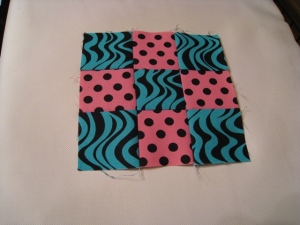
Finished block

Finished block

I seriously thought about telling people to press the block seams to the dark side again but I think I’ve hammered that enough.

So now you have five 9-patch blocks and a choice.  How do you want to lay out the quilt?

I’ll hurry and finish my quilt this month and take more pictures.   I won’t make people wait another 3 years for the remaining instructions but I’m not promising that it will be this weekend.

Motivation in the new year

So at the beginning of the year, I usually take stock of the stitching and plan what to do and I have some projects lined up to finish quick, as motivation for the rest of the year.  This year, I had a new start planned and that didn’t work out as well as I thought it would.  So here we are on the 15th of the month and I’ve stitched a total of 1 hour.    That means I have a lot of catching up to do to stay on track.  The goal is to put 5 hours in on every project on my list which mean I have 14 hours of stitching on 3 projects to finish before the end of the month.

Some people would feel pressure and decide it wasn’t worth it.  To me, it’s a challenge.  It would be fun to just hang out Saturday and stitch this weekend.  Except its SharePoint Saturday and I’m looking for connections to find a new job.   However, I have a TV and Netflix in my sewing room now and  a DH who isn’t home on Thursdays anymore.  I’ll get my 14 hours in before the end of the month.  There are a few projects I could finish in under 5 hours so maybe I don’t really need a full 14 hours.

I can do this – it will be worth it.

And the new year starts – A Guilt Free January Fail

Just so you know for the past 2 years, I’ve focused on finishing things I’ve started with maybe one or two small starts for breaks or obligation pieces. The WIP list is under 40 and I’m feeling good about how close to being moved to the FUPPY pile things are getting. With that going on, I thought I could handle a Guilt Free January start, after all, Fire Wings Designs Sentinel has been screaming at me since July (I bought everything to start it at Nashville CATS so that gives some idea to how long I’ve had it).
So I put it up on scroll rods and put in 2 strands and I couldn’t do it anymore. I’m not sure if it’s knowing that I’m starting a medium to large project or working on the scroll rods or something else but, I keep thinking about another piece that is only an hour or two from being completed; including the finishing (I need to go buy some White satin ribbon to keep it from going into the FUPPY pile.)
So maybe I’m finally cured of my completion anxiety?
Or maybe I’m just remembering my last foray into Guilt Free January which resulted in so many of the current WIPs on my list?

Or maybe I’m feeling guilty for having an uncompleted piece that I started as a teenager that has been worked on by 5 generations of the women in my family?

Anyway, we’ll see if moving from scroll rods to bars improves my feelings about the piece.